
The Preferences dialog allows you to configure various options in World Machine to match either your tastes or your machine’s abilities.
Build Options
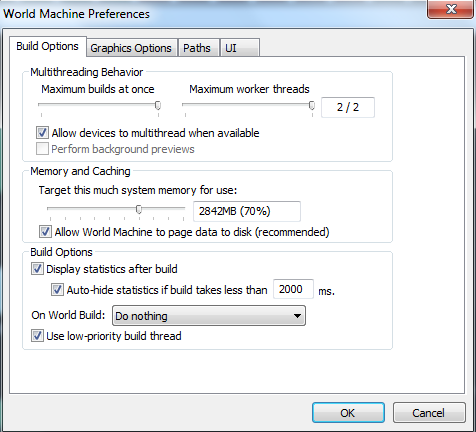
Multithreading Behavior (Pro Only):
These options are only available in the Professional Edition of World Machine!
● Maximum worker threads: Set the maximum number of threads to spawn. This should optimally be set to roughly the number of cores that your system possesses. However, you can set it less if want to reserve some computing power for other applications.
● Allow devices to use workers: If set, individual devices can launch worker threads if any are available. Only certain devices are multithreaded, but this option can noticeably speed up normal builds.
Build Options:
• Display statistics after build toggles whether the progress dialog that appears when the world is built disappears after the build process has completed, or if it remains for you to examine.
• Auto-hide statistics can intelligently hide the progress dialog if the build takes less than a certain amount of time in milliseconds. This is handy, as when you’re building just a few devices it saves you a few mouse clicks, while still showing the build stats for longer builds.
• On World Build allows you to control what World Machine does by default after the world is built. You may Do Nothing, Show the Last Active View, Show the 2D View, or Show the 3D View.
• Use low-priority build thread means that World Machine will not monopolize the processor, allowing other applications to pre-empt the build process easier and enabling you to have a build proceeding in the background with less noticeable impact to your other computing activities. However, the build will take longer to complete.
Graphics Options
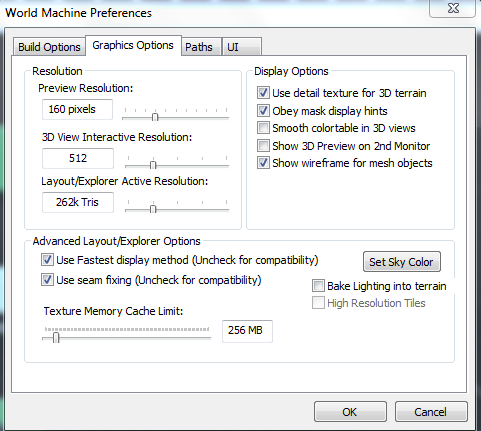
Resolution:
• Preview Resolution: Controls the detail level of the preview terrains that World Machine creates (used for the Leftside preview window and the 3D View before a device is built). The higher the resolution, the greater the amount of detail in all of the previews, however, they will take longer to create. A value of 64 to 128 is appropriate for most computer systems.
• 3D View Resolution Limit: Limits the maximum amount of detail that World Machine will allow in realtime in a 3D view. This is intended to allow users with less-powerful video cards to throttle down the 3D views to a level that works smoothly on their computers. Modern systems can leave this at 1024; older computers may need to limit to less.
• Layout Explorer Resolution: Control the amount of detail to allow in Layout and Explorer views. Adjust this setting to achieve a fluid framerate while still viewing as much detail as possible.
Display Options:
• Use detail texture: Enabling this will use a detail texture in the 3D view to help provide a sense of scale for the terrain.
• Obey mask display hints: When this is checked, heightfield hints are obeyed. See Section 2.x for more information on display hints.
• Smooth colortable: Smoothes the color transitions between the different heights. There is no performance hit for this option, therefore it is recommended that it remain enabled.
• Show 3D on 2nd monitor: When checked, World Machine will create an extra window that displays the current preview output to a secondary display.
Advanced Display Options:
● Use fastest display option: When this is enabled, World Machine will use OpenGL Vertex Buffer Objects to manage Layout/Explorer meshes. This results in the highest frame rates possible, however, some older and less compatible video cards have issues with VBOs. If you are experiencing random crashes in Layout view, try unchecking this option.
● Use seamfixing: When checked, Layout and Explorer mode will try to fix any seams that exist across tiles by performing blending. This option is recommended to be enabled, but it does cause a slight performance hit so you may disable it if absolutely necessary.
• Bake Lighting into terrain: When enabled, this setting turns off the real-time lighting of the terrain, and uses light maps to create shadows. This tends to be faster for most video cards. Note that with this enabled, moving the sun will cause all tiles to be regenerated.
• Set Sky Color: This option sets the color of the sky in Explorer View. The default is a light blue. You didn’t really expect it to do something else, did you?
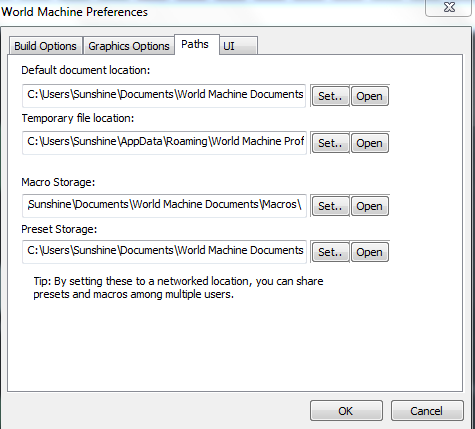
Paths
The Paths dialog simply allows World Machine to use a specific folder to store its presets and macros in. Typically you will not need to change this; it would be useful to do so if you wanted to share macros and presets across a local network.
UI Options
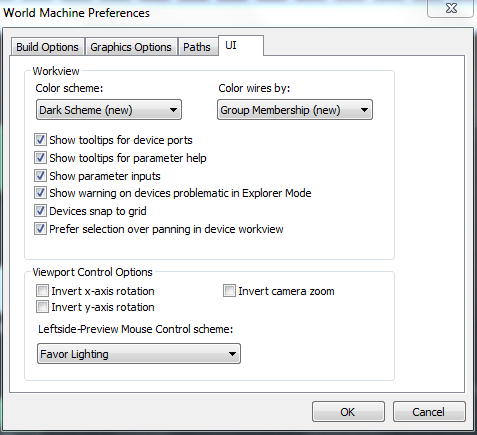
Workview:
• Enhanced workview graphics: Shades the device network using gradients and a more aesthetically pleasing method than the older, traditional shading.
• Route wires: Makes all wires run at only 0, 45, and 90 degrees, providing more clarity to the device network.
• Show tooltips for device ports: Displays the type of data that the port accepts, as well as the current range/value for parameter-type ports.
• Show tooltips for parameter help: Controls the help displays for parameters in the device configuration dialogs. To display help text, simply hover the mouse over the parameter name.
• Show parameter inputs: Toggles the display of the parameter input ports along the top edge of the devices. The ~ (or `) key toggles this option from the workview.
• Show warnings on devices: Displays a red ! mark next to the name of any devices in the network that are likely to not properly display when using Explorer mode. Any devices that display this symbol will not accurately represent the real shape of the terrain when viewed in Explorer mode, as explained here.
• Devices snap to grid: When moving devices, when this is checked they will snap their coordinates to grid points.
Viewport Control Options:
These settings change the navigation behavior of ALL 3D views in World Machine (Leftside, Main 3D View, and Explorer Mode).
• Invert x-axis rotation: When this is checked, moving the mouse left and right will cause the view to rotate in the opposite direction from the usual.
• Invert y-axis rotation: Turning on “Invert-y” is a popular option that makes the 3D views behave more like an airplane; pulling back on the mouse moves the view up instead of down.
• Leftside Preview Mouse Controls: By choosing between Favor Rotation and Favor Lighting, you can control which functions get assigned to the Left Mouse Button (LMB), the Right Mouse Button (RMB), or the Middle Mouse Button (MMB). Note that if you don’t have a middle mouse button, you can press the left and right together to simulate it.