
The professional edition contains additional features targeted at the visualization and game development industries. Several of these features are transparent; you use World Machine the same as before except with additional power.
Transparent Improvements
64bit Support
Workstations running 64bit Windows XP or Vista can use the 64bit World Machine executable. This removes the often-encountered 2GB 32bit memory addressing limit, and allows World Machine to take advantage of as much memory as your workstation contains.
Massive Multithreading
The dramatic improvements in performance possible with multi-core processors allows for greatly enhanced speed and usability. World Machine Professional edition supports up to 16 simultaneous processors for use during both normal and tiled builds. In addition, they are used to accelerate the view during Layout and Explorer Views, dramatically reducing the time to see changes and improving the utility of these views.
(See Section 9.1 to configure the allowed number of threads)
Tiling
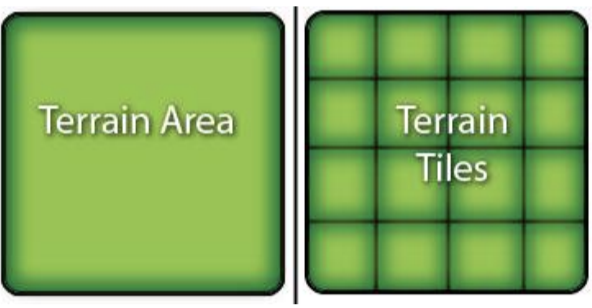
A tiled terrain is simply a terrain stored across many individual files instead of a single large file. The files are named similar to each other in some logical fashion. This can be advantageous for several reasons — some display engines may be able to page individual files in and out of memory to improve performance, and in a shared environment individual artists can work on separate files without issue.
Most importantly however, the practical resolution limit for a single heightfield in World Machine is around 8192×8192; even with 64bit systems working with a single file this size or larger can become quite unwieldy. Tiling offers a way around this problem. By saving the terrain area as a rectangular set of individual files, you can export vast areas of terrain at effectively unlimited resolution.
World Machine Professional version supports seamless use of tiled terrains; you won’t have to worry about individual files, instead you will be working with the tileset as a whole. Tiled terrain support is not limited to export; you can complete the circle by importing tiled terrain datasets, allowing you to work
with datasets that may span many hundreds of files and multiple-gigabytes easily and intuitively.
Tiled Output
There are three steps required to export a tiled terrain:
- Set the tiled export parameters described below.
- Enable tiled export for each of the outputs you wish to export.
- Select the Tiled Build action from the toolbar or menu to commence building.
We’ll follow each step required for export in order.
Step 1: Tiled Export Parameters
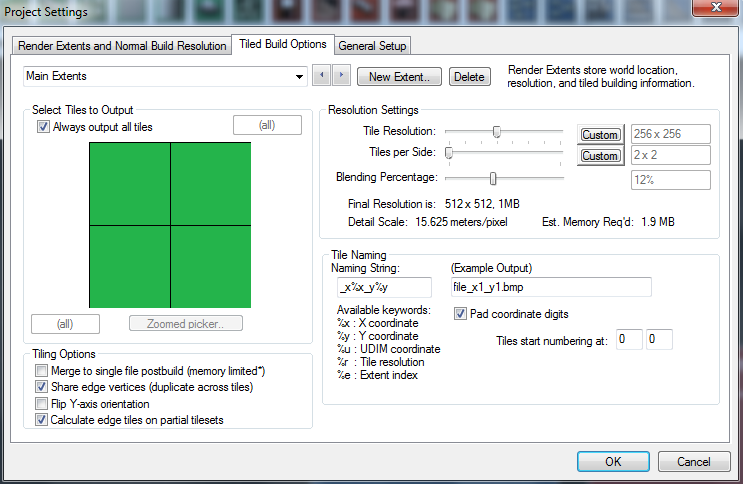
Set the Tiled Output Setup by visiting the 2nd tab of the Project Settings Dialog:
Tiled Build Render Extents
Set which render extent you wish for a tiled build to use; by default it will always use the currently set render extent, but you can override this behavior to have the tiled build always be performed on a particular render extent.
Tile Output Subset
You can optionally export less than the entire tileset; this is useful if you have made modifications to only certain regions of your world and want to overwrite only those specific tiles.
Resolution Settings
- Tile Resolution: The resolution of each individual tile. You can use the slider to select a power-of-two size, or click the Custom button to enter a custom tile size.
- Tiles per Side: The number of tiles per side to export. The final resolution of the tileset will be the tile resolution times the number of tiles per side.
- Blending Percentage: The blending percentage controls the amount of additional data created for each tile to enure that terrain behaves correctly across tile edges; see “Potential Tile Issues” below for more information.
Tiling Options
● Share Edge Vertices: This option controls how edges are handled across tiles. When Share Edge Vertices is checked, the edges of each tile will have the same value as the edges of each adjacent tile. This allows any meshes created from them to sit seamlessly against each other.
● Merge Output into single file: When this option is checked, World Machine will attempt to merge all of the tiles into a single file. The ability to take this action is largely limited by available memory, as it needs to be able to allocate the entire container file at once. If it fails, it will export tiles like normal.
● Flip Y-axis orientation: Invert each tile on the Y axis; useful when converting between a coordinate system where Y increases downward versus upward.
Tile Naming String
A tile is located in the tileset by a coordinate appended to the filename. During a Tiled Build, the naming string appends the coordinate of the tile to the output filename. You can control the string with keywords:
| Keyword | Action |
| %x, %y | Insert the X or Y coordinate respectively into the name |
| %res | Insert the resolution of the tile into the name |
The default naming string is : _x%x_y%y
An Example using this String:
You set in File Output : test_output.png
Normal Build exports: test_output.png
Tiled Builds will export: test_output_x5_y9.png for the tile that is at location (5,9) in the tileset
There are several additional options when naming tiles:
● Pad coordinate digits: This determines whether leading zeros are applied to the coordinate numbers. for example, in a 30×30 tileset:
○ Padding checked: test_output_x08_y15.png
○ Padding unchecked: test_output_x8_y15.png
● Tile numbering start: The number to start counting the tileset from. Usually either 0 or 1.
Step 2: Enabling Tiled Export
Each output that you wish to save during a tiled export must be enabled for that purpose. To do this, visit the properties page of the output in question. Below is the example for Heightfield Output.
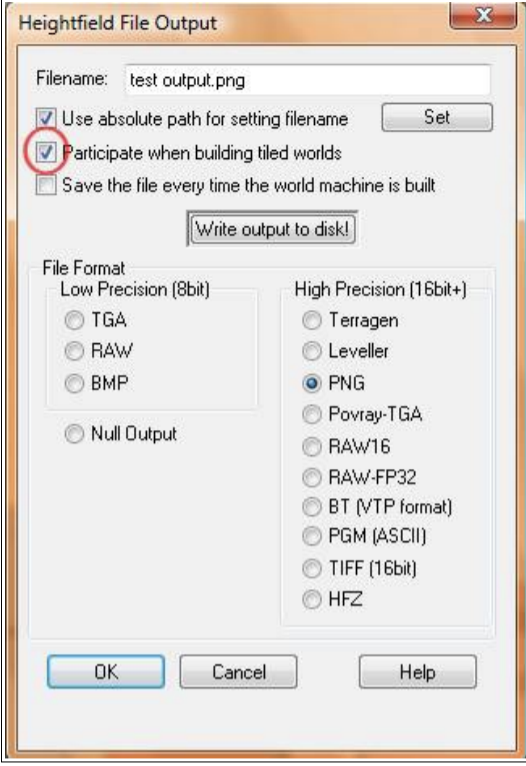
Make sure that the “Participate when building tiled worlds” checkbox is enabled, and that you’ve set a filename and type.
Step 3: Build the World
Select the Tiled Build option from the toolbar or menu to commence building. A confirmation dialog will appear, showing which outputs you enabled in the step above for export:
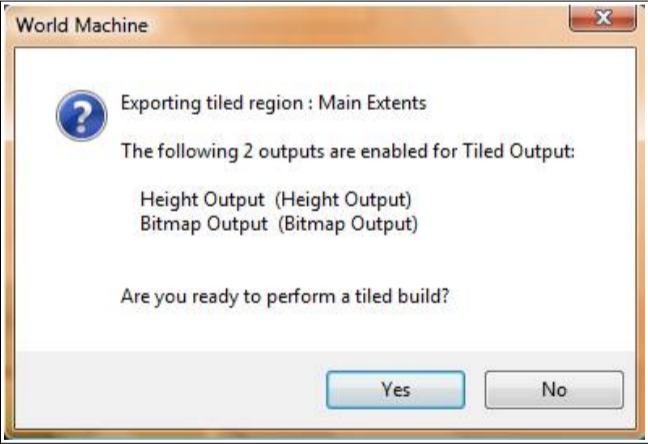
Clicking Yes will begin the build. The tileset will be exported to the same folder as the single file would be created in during a normal build.
Potential Issues with Tiling
There is one major potential issue to be aware of when dealing with tiled output. Some devices, including the simulation-based devices such as Erosion and Snow, can produce different results in tiled mode versus normal builds. The reason for this has to do with the context-sensitive nature of those algorithms; when tiling, they do not have access to information from outside of the tile region.
World Machine compensates for this by building an extra area around the tile and then blending between the tiles during the “Merging” Phase of the build. You can control this with the “blending percentage” slider in the Tiled Output setting. In general, terrains with light erosion can use very little blending, while terrains that have huge amounts of variance across tiles will need more blending.
Tiled Input
The ability to import a tiled terrain set completes the circle, allowing for data to flow round-trip in and out of World Machine and other software. The power of the Tiled File Input device lies in the fact that it maps the entire tileset into a user-defined area in worldspace. From there, you can work with as large or small a portion of the tiled area as you want. In addition, since the Tiled File Input is simply another device in your world machine workflow, you can have as many input streams as you wish, allowing you to use many possibly overlapping tiled datasets, or to import texturing as well. To place a Tiled File Input device into the world, select it from the toolbar:

Editing the properties brings up the following dialog:
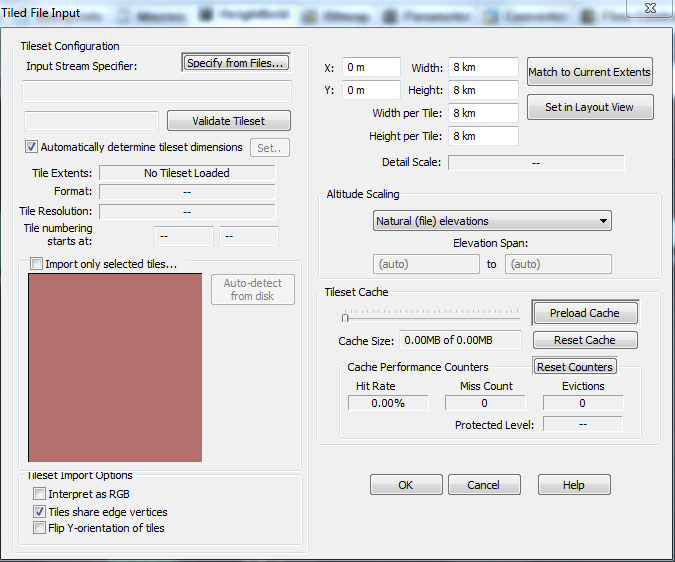
Establishing the tileset input stream
Once you click “Specify from files”, it will bring up the following dialog:
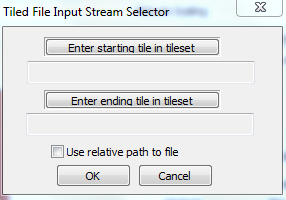
By specifying two tiles within the set of tiles you want to import, World Machine will attempt to determine the naming scheme in use for tile coordinates. In general, as long as each tile is identified with a discrete coordinate within the tileset, it will be able to parse out the naming system.
By default, World Machine will determine the total extents of the tileset even if they lie outside of the two files you specify; for example, even if you selected “tile_3_1” and “tile_5_2”, World Machine would search for all other matching tiles and determine the full set by itself.
There are two extra options available while specifying the input dataset:
● Import Selected subset only: If you select this option, only the tiles that lie between the selected ones will be imported. In the example mentioned above, with this checked, only the rectangular area of tiles between tile (3,1) and tile (5,2) will be imported.
● Use relative path to file: allows you to locate a dataset by relative path rather than absolute. If the dataset is located in a folder that is underneath the location specified in Project Settings, the path will be stored as a relative path; otherwise it will remain absolute.
Once you have selected the tilestream, World Machine will attempt to validate the tileset by determining the tileset extents and making sure that each tile exists.
Establishing world space location
The upper-right corner of the dialog allows you to specify where in worldspace the tileset should be located. You can set the location and size of the overall tile area, or set the size of each tile and let WM calculate the total size for you. If you prefer, you can set the location graphically by clicking on the “Set in Layout View” button.
Setting your file’s elevations
There are several ways you can map the tileset’s elevations into the world:
● Natural Elevations: Ensure that the height values in the input files are translated correctly into the same elevation in World Machine
● Full Range: Map the elevations present so that the highest and lowest elevation completely span the possible elevation range inside of World Machine
● Specify: Specify an altitude range in meters that the input data should fall between.
After the mapping of height values, any heights out of range will be clipped to the minimum and maximum altitudes allowed.
Tileset Options
You can set options for tiled input, including:
● Interpret as RGB: When toggled, the Tiled Input device will produce a Bitmap output instead of Heightfield output.
● Share Edge Vertices: If World Machine should assume that the edges of each tile will match. When this option is not set correctly, there will be a one pixel offset in your tileset; Check the export options from World Machine or your other source of tiled data to see what this should be set to.
● Flip Y-axis: Enable this if the source of your tiled data exported each tile using a top-left origin rather than bottom-left; You will be able to tell because each tile will be in the right order but upside down.
Performance tuning
The Tiled File Input device uses a multi-resolution cache to making working with your tile set easy. The default settings will usually achieve optimal performance; however, you can adjust the total amount of space allocated to the cache if you want to accommodate an extremely large tile set.
Automation
World Machine Professional supports a simple but useful form of automation using XML-based scripting. This allows you to load, build, export, and modify basic world settings all from the command line.
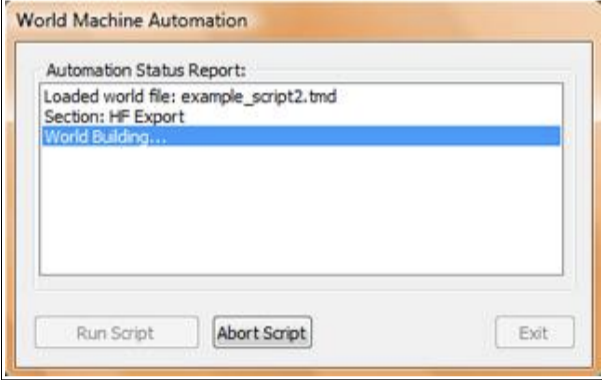
You can launch automation in two ways:
- From within the World Machine GUI, by choosing “Run Automation Script…” from the File menu:
- From the command line, by dragging a WM script onto the executable, or launching World Machine with the name of the script file as the parameter.
A Brief Introduction to XML
For those not familiar with the XML markup language, it is quite similar to HTML in overall approach. You create an XML document by using tags denoted with the and markers. Unlike HTML however, the application defines its own tags; the tags you define determine what is in the datafile. Tags are hierarchical, and may contain children by defining new tags between the begin <> and end tags. Tags may have any number of parameters associated with them. For example:
<mytag> ... </mytag> is a valid XML tag<mytag1> <mytag2> </mytag2> </mytag1> is a valid XML relationship; mytag1 is mytag2's parent.
<mytag name="My.. tag..." action="none" /> is a valid single-tag XML tag with two parameters, name and action.
The tag <!-- ... --> is a comment tag. You may put any text into the ... area and it will be ignored by the
XML parser.World Machine XML Scripts
Always start the script file with the XML header declaration.
<?xml version="1.0" encoding="UTF-8" standalone="no"?>

After the header, there must be one and only one root tag, in this case using the <automation> container tag.

The tags inside are processed and executed in line order.
There are three main types of commands that you can execute from a script file:
- Worldfile Actions: Load or save a world file (TMD). Each script must include a load command
to load a worldfile from disk. - Modification: Change something within the world. The most common modifications would be
to change the output resolution, or enable/disable devices or groups of devices. - Building/Export: Actually perform the build process and export to files.
An Example Script
An example script is shown below. Most of the tags are self-explanatory; a full listing of the available tags is in the following section.
<!-- -->
<!-- Example World Machine Pro script file. These
files are in XML format -->
<!-- The example_script2.tmd file is setup to allow us
to quickly change what outputs we're using to export a
low-res mesh and a high-res normalmap.
<!-- -->
<!-- XML header declaration -->
<?xml version="1.0" encoding="UTF-8"
standalone="no"?>
<automation version="WMP2">
<!-- Load a TMD file into WM-->
<load file="example_script2.tmd"/>

<section name="HF Export">
<!-- Set the resolution to 512, enable the output group
named A, then build and export the world (this builds
the normalmap) -->
<modify>
<world res="512" />
<enable group="A" />
<disable group="B" />
</modify>
<build mode="normal"/>
<output/>
</section>
<echo text="Group changover, and re-build for mesh
export"/>
<section name="Mesh Export">
<!-- Set the resolution to 64, enable the output group
named B, then build and export the world (this builds
the mesh) -->
<modify>
<world res="64" />
<enable group="B" />
<disable group="A" />
</modify>
<build mode="normal"/>
<output/>
</section>
<echo text="Example Script Completed"/>
</automation>
World Machine Scripting Tags : General
Tag: <automation> ... </automation>
Parameters:
● version ("WMP2")
This tag is the parent container for the WM automation scripting data. The version parameter must be
always equal to "WMP2", this is the currently defined version number for World Machine Professional.
Tag: <section name="" enable=""> ... </section>
Parameters:
● name ( = string )

● enable (= "true"|"false"|"yes"|"no" )

The section tag allows you to group together sets of commands into logical sections. You can name each section, and enable/disable it by changing the enable parameter. A disabled section is skipped during script parsing.

The other important ability of a section tag is to localize failure. If any major command (e.g. <load/>)fails, that command propagates an abort message until it hits a section tag or the root container. Thus without sections, any one failure aborts the script. Within a section, only that particular section will
abort; other sections will continue to process, which is usually the intended behavior.

Tag: <echo text=""/>
Parameters:
● text (= string )
This tag echoes the text string input to the scripting output display. It has no other effect.
Tag: <load file=""/>
Parameters:
● file (= file path )
Loads a world file (TMD) from disk. You may specify either an absolute or relative file path.

Tag: <save file=""/>
Parameters:
● file (= file path )
Saves a world file (TMD) to disk. You may specify either an absolute or relative file path.
Tag: <build mode=""/>
Parameters:
● mode (= "normal"|"tiled" )
This very important tag builds the currently loaded world. Note that output files will only be created at this point if they normally would be during a build within WM — this means that your File Output devices must have “Save file every time the world machine is built” checked to save during a normal build.
The mode parameter controls whether a single-file or tiled build is performed. Either build type uses the current appropriate extents & resolution settings of the world file.
Tag: <output/>
Parameters: none
Can be called after a world build is performed, this command will export files from all currently enabled outputs.
Unless your File Outputs have “Save file every time” checked, this is the only way to export files from your normal build mode script!
World Machine Scripting Tags : Modification
World Machine supports a limited ability to modify the state of the device world from a script file.World modifications are all contained within a special container tag. Within, the various modification tags allow you to do things like enable or disable sets of devices, change the resolution of the world or the render extents used, and so on. By designing your world file with script control in mind, between the modify section and variables (described in section 10.3.6) you should be able to control virtually anything you wish from the script file.
Example use of the Modify Container

<modify>
<world res="512" use_extents="1" />
<enable group="A" />
<disable group="B" />
</modify>
Tag: <modify></modify>
Parameters: none
The <modify> tag is the container for all of the other commands in this section intended to modify the settings of the world. It must enclose all modification tags.
Tag: <world />
Parameters:
● res ( = value denoting the resolution of the world to build )
● use_extents ( = value specifying which render extent to use: zero-based, these correspond to the order they are listed within the Project Setup dialog)
The <world> tag modifies the project file's current world settings. You can change the build resolution and render extents used for any following normal build command.
Tag: <extent></extent>
Parameters:
● index ( = the render extent number to be modified)
The <extent> tag allows you to modify an existing world render extent. By adding child elements you can control extent specifications.
The three following tags are only valid in an <extent> block.
Extent Tag: <location>x0 y0 x1 y1</location>
An extent is specified by providing the four corners of the render rectangle as a sequence of four location values in kilometers. The string will look like this:
<location>0 0 12 12</location>
Specifying a world extent stretching from (0,0) to (12km, 12km).
Extent Tag: <resolution>value</resolution>
Resolution is specified by a single integer value:
<resolution>2096</resolution>
Extent Tag: <name></name>
A name can be given to a particular render extent by using the name tag.
When used together, a completed render extent tag may look like:
<modify>
....
<extent index=”2”>
<location>0 0 12 12</location>
<resolution>4096</resolution>
<name>Overview Extents</name>
</extent>
...
</modify>
Tag: <tile />
Parameters:
● res ( = integer value denoting the resolution of each tile for a tiled build )
● number ( = value giving the number of tiles to export )
● use_extents ( = value specifying which render extent to use: zero-based, these correspond to the order they are listed within the Project Setup dialog)
The <tile> tag modifies the project file's tiled build settings. You can change the tile resolution, number of tiles, and which render extent is used for any following tiled build command.
Tag: <enable />
Parameters:
● device ( = string )
● group ( = string )
This tag allows you to enable any disabled single device, or group of devices. You must specify the exact name (case sensitive) of the device or group in question. Specify only a device or a group but not both, one per enable command.
Tag: <disable />
Parameters:
● device ( = string )
● group ( = string )This tag allows you to disable any enabled single device, or group of devices. You must specify the exact name (case sensitive) of the device or group in question. Specify only a device or a group but not both, one per enable command.
World Machine Scripting Tags : Variables
A variable allows you to pass a value in from the script to influence device settings inside the device world. For example, you could control the amount of erosion, the number of terrace steps, color mixing amounts, or limitless other settings.
You link a variable to the device parameters you want to control by following these steps:
1. Create a <var> tag within the <variables> section. Provide a name and floating-point value
parameter in the variable definition.
2. Creating an "Automation Scalar" parameter device in the device world and set the "Variable
Name" field to the name of the variable above.
3. Connect the output of the Automation Scalar device to the parameter input(s) on the devices
that you wish to control.
Example use of Variables in the Script file

<variables>
<var name="erosion" value="0.6"/>
<var name="textureA_mix"
value="0.1"/>
<var name="textureB_mix"
value="0.55"/>
</variables>
Tag: <variables> ... </variables>
Parameters: none
The <variables> tag is the container for variables. All <var> tags must be defined within a <variables>
section block.
Tag: <var name="var1" value="0.1"/>
Parameters:
● name ( = string )
● value ( = floating point value)
The <var> command tag lets you define a variable. Each variable must have two parameters defined: the variable name, and its value. Variables must be defined within a <variables> section of the script file.